Rigging

Stylized Face Rig Practice by Jeremy Ernst

I signed up for CG Master Academy’s Facial Rigging Course so I’d have something to hold me accountable to doing another face rig, since they can be quite tedious. I went with a stylized model, which I picked up off CG Trader.

I should definitely have put more time and effort into making the pose tests, but I got bored. I don’t think I had the fleshy eyelids implemented at this point either.

I should definitely have put more time and effort into making the pose tests, but I got bored. I don’t think I had the fleshy eyelids implemented at this point either.

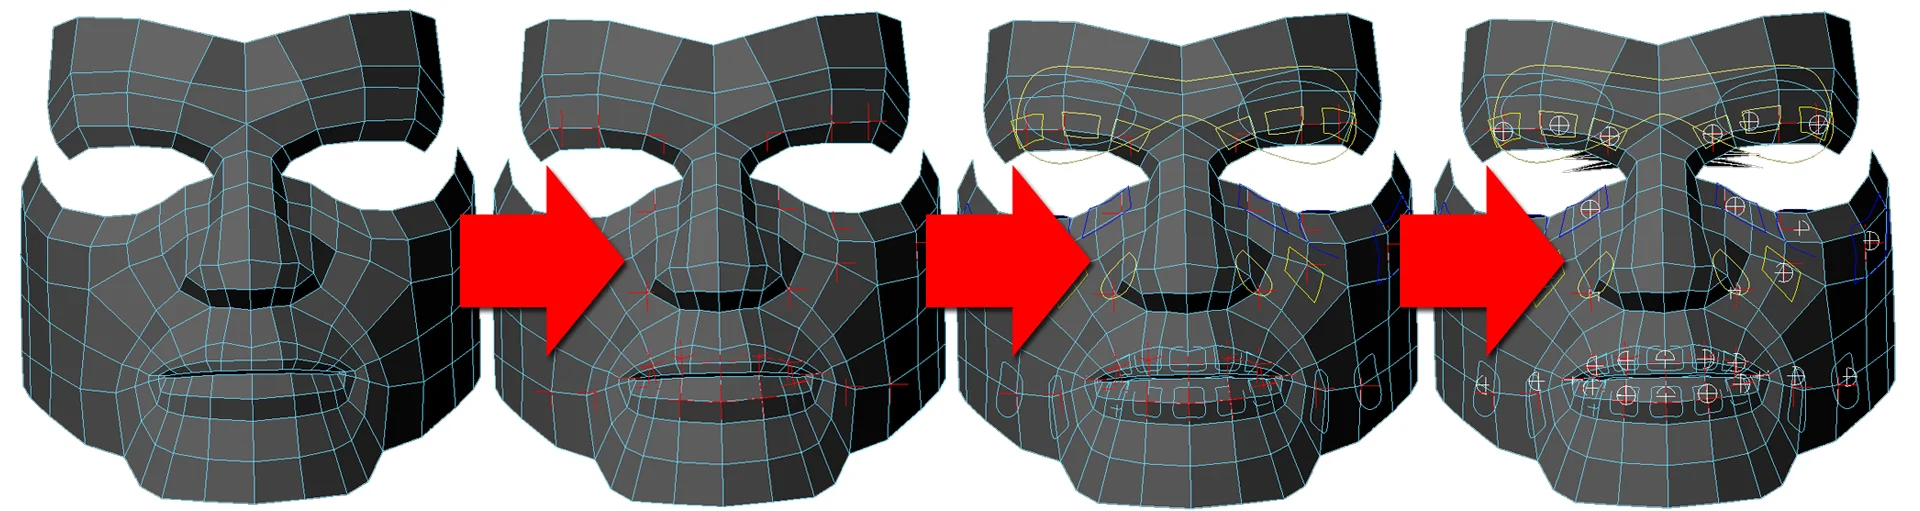
The face rig uses a combination of blendshapes, joints, and deformation layering. The two new things I picked up were the method for “smart blink”, where the blink line remains clean regardless of the eyelid poses. The other thing was space switching for the upper lip, which required having a main joint for the upper lip that any other upper lip joints would be parented under, then setting up spaces on that main upper lip joint to either follow the head or the jaw.

I learned how to use Mudbox, so I could sculpt the shapes needed. Also messed around with Arnold to render some of the poses out. I did a quick mocap test using my iPhone and the MocapX app. It did alright, but out of the box, is quite stiff, almost like stop motion. I could probably have iterated more on the poses it wanted as well, but I didn’t want to spend too much time on it.

Joint-Based Muscle Setup by Jeremy Ernst

I wanted to test out a simple solution for adding more volume preservation and movement using just joints and a simple squash/stretch segment setup. The idea was to place joint segments where the muscle would tend to sit, then utilize a single chain IK solver combined with squash and stretch on the base joint to get volume preservation.

For example, the pectoral muscle attaches along the sternum/clavicles, and inserts itself near the bicep.

pectoral.jfif

Because we’re dealing with a simplified skeleton, the joint segment is going to be parented under the relevant spine joint, with the end of the segment landing somewhere on the upper arm. (In my quick test, I didn’t place it super accurately to the muscle, but the desired result is achieved regardless). The script (posted below) will create the setup and parent the IK handle under the insertion parent, the upper arm in this case.

Combined with using NgSkinTools, this was a really quick way of achieving some decent joint-based volume preservation.

This was the simple script I wrote to setup the stretchy segments for the muscles:

The final result:

Personal Project: Cartoony Witch Face Rig by Jeremy Ernst

I’ve been working on a survival horror game in my free time, but during the month of October, I wanted to switch gears and try to make a cartoony face rig. I first watched Josh Sobel’s Expressive Facial Rigging, and then worked out how I could apply some of those concepts in a more game engine friendly manner. (Hint: it’s just lots of joints and corrective shapes). Unfortunately, aside from using Alembic exports, the whole global/local rig concepts in the tutorials isn’t really applicable to game engine workflows.

I’m probably about 50% happy with the end result. There is a lot more I’d like to have done, but I set myself a time limit as to not spend forever on it, so maybe the next one will go a bit faster.

The rig is mostly joint-driven with about 20 corrective blend shapes. I also threw some quick dynamics on the hair and hat in UE4, but they’re not very polished.

Here it is rendered in UE4:


And here it is in Maya:


UE4 Layered Clothing Test by Jeremy Ernst

I was working on making some ARTv2 rigging tutorials using this model (how to rig a custom asset), but got distracted and decided to get it in UE4 and play around with getting the layered clothing looking okay. Trying to get clothing not to clip into everything can be challenging, and this mesh had lots of layered bits that all needed to collide properly. It’s not 100% perfect, but good enough for the time put into it. I wanted to do more, like add more dynamics to the hair and such, but I figured I should get back to actually making those tutorials I set out to make in the first place!

June 2016 Update by Jeremy Ernst

A lot has happened here at Epic since the last post! We've shipped Paragon on early access, we had an amazing GDC showing, and we continue to ship a hero every three weeks. In between all of that, I've been working on the tools when possible.

GDC

McLaren Enterprise Demo

I had the privilege of working with our enterprise division on a demo showing a McLaren 570s in our engine. I rigged the car, which before I started the task, thought would be simple. Turned out, the model was from the CAD files, where every nut, bolt, and screw is modeled out. Needless to say, to took far more time to do than I had anticipated, but it was a lot of fun.

Here are a couple more tidbits from rigging the 570s that the trailer doesn't really show.

The interesting thing to note about this is that there is no skinning information here. It's all static pieces attached to joints, inheriting the joint transformations. Check out the live stream to learn more about that.

The interesting thing to note about this is that there is no skinning information here. It's all static pieces attached to joints, inheriting the joint transformations. Check out the live stream to learn more about that.

Hellblade Realtime Performance Demo

We partnered up with Ninja Theory, Cubic Motion, and 3lateral to do something unprecedented; driving a real-time character through live body motion capture and a live facial solver in UE4. 

 ARTv2

Since the last update, a lot of progress has been made. Both the arm and torso modules are now done, leaving only the head and chain left (which are probably the easiest of the bunch).

Quick demo of the arm rig. 

Quick demo of the arm rig. 

The auto clavicle has been re-written to use pose space, which achieves much more reliable results.

The auto clavicle has been re-written to use pose space, which achieves much more reliable results.

Quick demo of new finger rig features

Quick demo of new finger rig features

Quick demonstration of torso rig features.

Quick demonstration of torso rig features.

One of the things I spent some time on that I'm really happy with was how users install the tools and how they will get updates. The old installation method is messy at best, and prone to errors. Updates are a nightmare. Users need to wait on either new engine releases or know about the dropbox link that holds the latest scripts. It's a mess for everyone, including me.

So I spent a couple days and now have a super simple way of installing the tools. 

Now the issue of getting updates. I wanted to investigate the work in adding a feature directly to the tools that would search for updates, and automatically apply them. 

Lastly, and this last tool is more for me, I needed a reliable way to generate release notes and a zip archive of the tools that would coincide.

The next update, I should have the head and chain modules done. I'm also looking into writing a 'report a bug' feature that will utilize github's issue tracking system.

Animation and Rigging Toolkit by Jeremy Ernst

These are the tools I have been writing for the last two years, and they are now available to Unreal Engine 4 subscribers! (www.unrealengine.com). Check them out!

The video below goes over a narrated version of the tools:

Check out an overview of the Animation and Rigging Toolkit! This is the toolset Epic Games' lead technical animator Jeremy Ernst created for our own internal projects, and now Unreal Engine licensees and subscribers can have it too!

Gears of War 3 Work by Jeremy Ernst

Gears of War 3 Rigging Reel

A small sample of the rigging and tools work completed for Gears of War 3!

ears of War 3 Facial Rigging GDC 2011 Talk

This is my GDC 2011 talk about the facial rig setups in Gears of War 3.


Gears of War 3 Pipeline GDC 2012 Talk

​My GDC 2012 talk covering the entirety of the rigging and animation pipeline for Gears of War 3 and how the pipeline evolved by learning from past lessons.